Palette swapping (reusing one sprite with different colors) started as a memory-saving hack on the NES and became a defining look of retro games. It is cheaper than ever now: drop a sprite into a recolor tool, define a palette, and ship ten character variants from one set of frames.
The Trick That Built Gaming's Visual Vocabulary
Look at the green Koopas and red Koopas in Super Mario Bros. Same sprite, different colors. Look at the palette-shifted ghosts in Pac-Man, the "Ninja" archetypes in Double Dragon, the elemental enemy variants in every JRPG ever made. They're all the same move: take one sprite, swap the colors, call it a new enemy.
The motive was engineering, not art direction. The NES had 2 KB of RAM and could display roughly 64 unique 8x8 tiles on screen at once. Shipping eight distinct enemy sprites for what should be "the same enemy, but stronger" was impossible. Palette swapping let designers multiply their cast without multiplying their memory budget.
Four decades later the binding constraint is artist time rather than memory, and palette swapping is still the fastest way to turn one character into five.
Why Palette Swaps Still Work in 2026
Modern hardware could draw a unique 1024x1024 sprite for every enemy. So why do indie games like Hyper Light Drifter, Crypt of the NecroDancer, Eastward, and Celeste still palette-swap aggressively? Three reasons:
1. Visual consistency. When all your water elementals share a silhouette, players learn "blue rippling outline = water creature" instantly. Swap the palette to red and the player instantly understands "this one is fire." Your design communicates without a tutorial.
2. Production velocity. A solo dev can draw 4 unique enemies or draw 1 enemy and palette-swap it 4 times. Same visual variety, 75% less art time.
3. Balance iteration. When you discover halfway through development that an enemy type needs a harder variant, palette swap is instant. No new frames to draw, no animations to retime.
The modern meaning of palette swap isn't "we couldn't afford new art." It's "we deliberately used color as our design language."
How the NES Actually Did It
Understanding the original technique tells you why it works so well even today. The NES stored sprites as index-based tiles: each pixel in a tile was a 2-bit number (0-3), which pointed into a 4-color palette. The palette was stored separately from the sprite.
To create a variant, the game swapped the palette in memory. Same tile data. Same pixel positions. Different colors on screen.
That's the whole trick. The sprite "Koopa Troopa" and "red Koopa Troopa" are the exact same bytes of graphical data; they reference different 4-color palettes. On the NES, this consumed roughly 16 additional bytes per variant instead of the hundreds of bytes a new sprite would have needed.
The lesson that carried forward: if you design your sprite against a small, deliberately chosen palette, you unlock cheap variants forever.
Palette Swap Workflows in 2026
You can palette-swap three ways today, in increasing order of sophistication. Pick the one that matches your project.
Approach 1: Pre-Baked Variants (The Simple Way)
Keep it dead simple:
- Draw your base sprite with a limited palette (say, 6 colors).
- Make a copy of the sprite sheet for each variant.
- Use a recolor tool to replace color #1 -> color #2 -> color #3 -> etc.
- Export each variant as its own sprite sheet.
- Load the appropriate variant at runtime based on your game logic.
Pros: Works in every engine. No shader knowledge needed. Zero runtime cost.
Cons: Storage grows with variant count. If you have 50 enemy types x 4 variants each, you're shipping 200 sprite sheets.
For most indie games, this is totally fine. A 16x16 sprite at 200 variants is still kilobytes of data.
The Recolor tab does step 3 across the whole layer at once, so a variant is one slider drag rather than a per-frame edit.
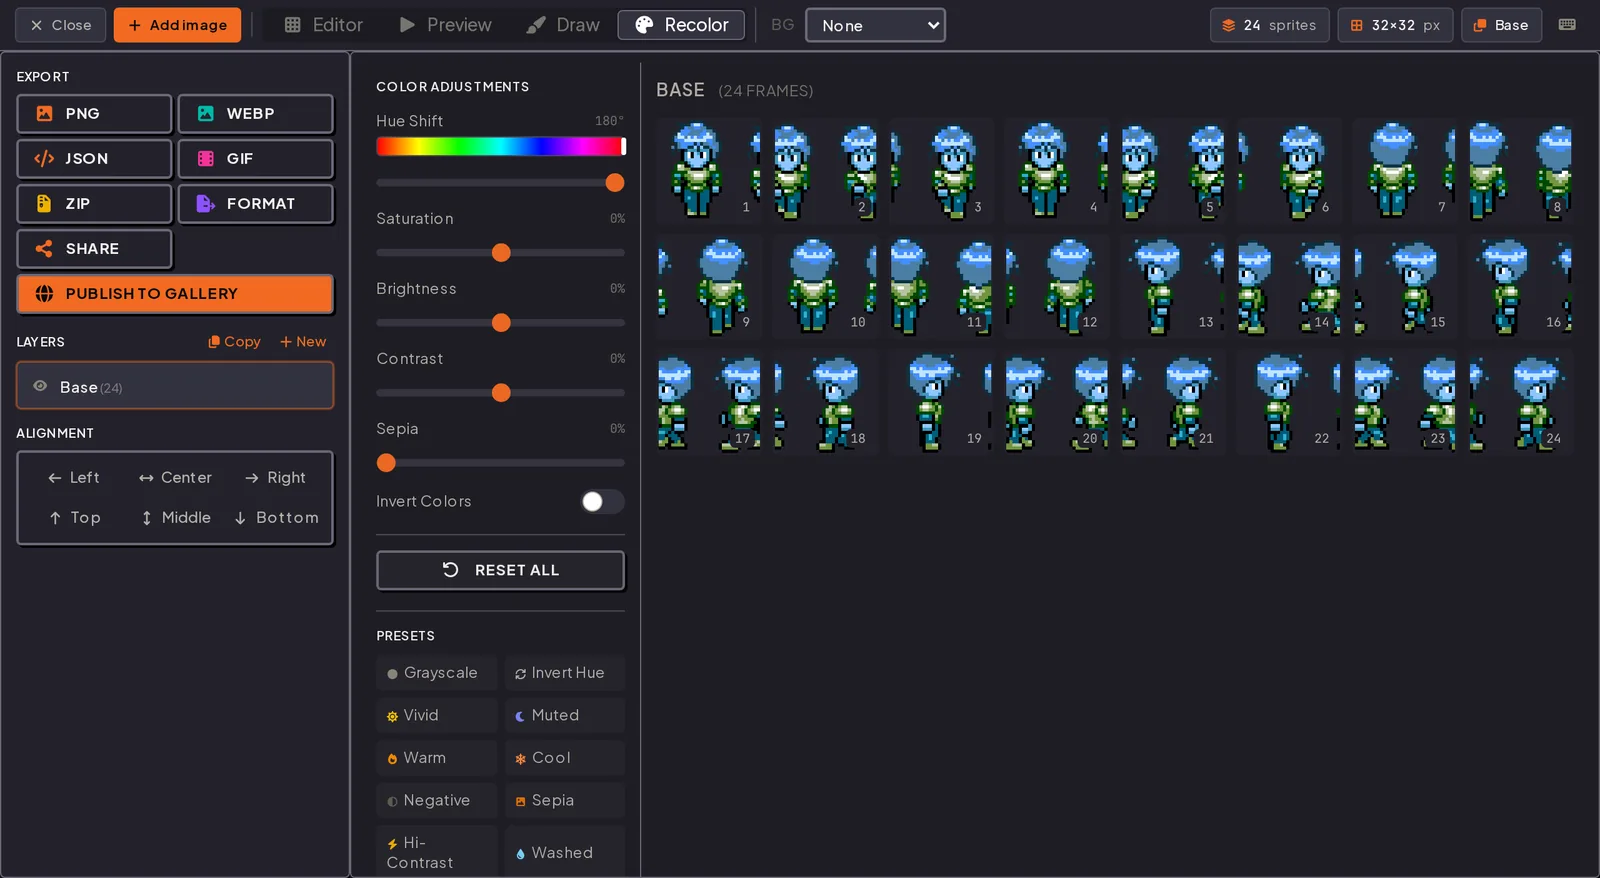
Hue, saturation, brightness, contrast, sepia, and invert stack on top of each other, and the presets down the side cover the moves you reach for most: grayscale for a petrified state, invert hue for an opposing team, muted for a background enemy tier. Apply to All writes the result into every frame of the layer, and Reset All puts the original colors back.
Copy the layer first (Copy in the Layers panel), recolor the copy, and export each layer separately. That gives you the base and the variant from one project instead of juggling several exports of the same sheet.
Approach 2: Runtime Color Replacement (Shader Method)
Instead of shipping multiple sheets, ship one and swap colors at render time with a shader.
Your sprite uses a known small palette (16 colors, say). The shader receives two palettes, the original and a target. For each pixel, it finds the color in the original palette and outputs the corresponding color from the target palette.
A minimal GLSL palette swap shader (Godot / Unity compatible with small tweaks):
uniform sampler2D sprite_texture;
uniform vec4 source_palette[16];
uniform vec4 target_palette[16];

vec4 palette_swap(vec2 uv) {
    vec4 pixel = texture(sprite_texture, uv);
    for (int i = 0; i < 16; i++) {
        if (distance(pixel, source_palette[i]) < 0.01) {
            return target_palette[i];
        }
    }
    return pixel;
}
Pros: One sprite sheet, infinite variants. Change palettes at runtime. Flash effects, damage indicators and team colors are all one uniform away.
Cons: Requires shader support. Runtime cost per pixel (cheap on modern hardware, noticeable on ancient mobile). Palette must be small enough to fit in a uniform.
Approach 3: Palette Texture Lookup (The Pro Move)
Instead of looping through palette arrays, store the palette as a tiny texture. The sprite's "color" is an index into this palette texture, so swapping the palette is a texture swap.
This is how Crypt of the NecroDancer and Enter the Gungeon handle their extensive color variants. A single sprite, a tiny palette texture per variant. Swap the texture, get a new character. Near-zero runtime cost.
Setup is more involved:
- Convert your sprite to an indexed format where each pixel stores a palette index in the red channel.
- Build palette textures: 1xN pixel strips where pixel (0, i) holds the color for index i.
- Write a shader that reads the sprite's red channel as an index and samples the palette texture at that index.
You need tooling for step 1, but once it's in place, every artist workflow stays the same (draw in normal colors) and the conversion happens automatically on export.
Rule of thumb: Pre-baked variants for 2-5 variants. Shader-based for 6-20 variants. Palette texture lookup for 20+ variants or runtime-generated palettes.
Palette Design Rules
Not every sprite palette-swaps well. Design yours with swapping in mind and the technique becomes magic. Design yours naively and swaps look like crap.
Rule 1: Keep the Palette Small
The NES got 4 colors per palette. You don't need 4, but you should stay in the 4-16 color range. Why? Each additional color means more choices when building a variant. A 64-color palette requires 64 coordinated decisions to make a clean variant. A 6-color palette requires 6.
Indie games using 4-8 color palettes can generate dozens of clean variants without a design system breaking down. Games with bloated palettes struggle to produce even a single convincing swap.
Rule 2: Separate Luminance from Hue
The most common palette-swap mistake: changing colors without preserving lightness relationships. A character's shadow color should stay darker than its midtone, which should stay darker than its highlight. If you swap just the hue of each color without controlling luminance, you get weird visual inversions where shadows become lighter than highlights.
The fix: design your base palette as a luminance ramp. Pick your darkest, midtone, and lightest. Make sure variants follow the same ramp in a different hue.
Rule 3: Anchor With Black and White
Keep at least one very dark and one very light color that doesn't change between variants. Usually this is the outline (pure black or very dark) and highlights (pure white or cream).
Why: these anchors give your eye a stable reference. A character whose entire silhouette changes color looks like a different character. A character whose interior changes color but keeps the same black outline reads as a variant of the first character. That's exactly the perception you want.
Rule 4: Test at Small Scale
At 400% zoom in your editor, every variant looks fine. At the game's actual resolution, where the character might be 16 pixels tall, only the variants with strong silhouette contrast survive. Design your palettes to have good tonal range, not just good hue range. A pale yellow-green variant that looked fine in Aseprite might be indistinguishable from the original at 1x zoom.
Common Palette-Swap Patterns
Some patterns have been used so often they've become archetypes. Steal them shamelessly:
Elemental variants. Fire (red/orange), ice (blue/white), earth (brown/green), lightning (yellow/purple). Every RPG ever made.
Difficulty tiers. Green for easy through to gold for legendary. Diablo, Borderlands, Crypt of the NecroDancer.
Faction coloring. Red team against blue team. Each faction gets a coordinated palette shift; everything else stays identical. Strategy games, team PvP.
Day/night cycles. One tileset, palette swapped to shift color temperature. Warm oranges for day, cool blues for night, subtle reds at dusk. Stardew Valley, Terraria, Moonring.
Damage state. Flash the whole sprite white for two frames on hit. Nearly every action game does this, and it is a palette swap at the frame level.
Player customization. Hair color, skin tone, armor tint. All palette swaps layered on top of a base character. Stardew, Rimworld, countless roguelikes.
Doing It Right: A Concrete Example
Let's build a classic. One goblin, four variants.
Step 1: Base Sprite + 6-Color Palette
Draw a goblin with the following palette:
- Dark outline (#1a0e0e)
- Skin shadow (#2d5a2d)
- Skin midtone (#4a8b3d)
- Skin highlight (#7bc85a)
- Cloth shadow (#5a3a1a)
- Cloth midtone (#8b6430)
Step 2: Variant Designs
| Variant | Skin Palette | Cloth Palette |
|---|---|---|
| Goblin Scout | Original greens | Original browns |
| Goblin Warrior | Same greens | Blue-grays (#2a3a5a / #4a6b8b) |
| Goblin Shaman | Pale purples (#5a3a5a / #8b6b8b) | Red-golds (#6b3a1a / #b88b30) |
| Goblin Chief | Deep reds (#5a1a1a / #8b3a3a) | Dark purples (#3a1a3a / #6b3a6b) |
Every variant keeps the dark outline color and the same luminance ramp, and each gets one distinctive color that still reads at 16x16.
Step 3: Export Four Sheets
Drop the goblin's sprite sheet into the recolor tool, define each variant's palette, export each variant as its own sheet. Four enemies, one original drawing.
Total time for all variants: about 10 minutes with a good tool. The same variants hand-drawn from scratch would take 4-6 hours minimum.
Advanced: Dynamic Palettes
Once you're comfortable with static swaps, the next level is dynamic. A few techniques:
Gradient Palettes
Instead of picking solid colors, pick a gradient along which the palette slides. A character that transitions from blue to purple to red as it gets angrier is just one sprite with an animated palette uniform.
Generative Variants
Procedural games need procedural palettes. Build a palette generator that picks a hue, derives an analogous or complementary hue, and assigns them to slot positions. Every run of the game, every enemy gets a unique palette. Used extensively in roguelikes and procedural platformers.
Palette Blending
Cross-fade between two palettes over a few frames to create smooth color transitions. Use this for team captures, power-ups, status effects, or weather shifts. Much smoother than an instant swap.
Tools for Palette Work
Four that earn their place:
- Lospec holds thousands of curated palettes with downloadable files.
- Aseprite has palette management and color replace built in.
- Coolors generates new palettes from scratch or from an image.
- Our recolor tool swaps colors in the browser and exports a variant sheet.
A good palette workflow means picking your base palette once (or pulling it from Lospec), locking it in, and then reusing it for every character in your game. Consistency across your cast is what makes palette-swap variants look cohesive rather than arbitrary.
Create palette variants without redrawing a single frame.
Drop your sprite sheet in, swap colors to build variants, export each one. Free, in-browser, no signup.
Why It Survived
The constraint that produced palette swapping is long gone, but the technique outlived it because it turned out to be good design as well as cheap production. A shared silhouette with coordinated color variants teaches the player faster than unique art for every enemy does: once they know what the shape means, the color tells them the rest.
That is worth more than the time it saves you.
Photos via Unsplash, free for commercial use. Historical information via the NES palette swap documentation at Every NES Game and shader techniques from KoBeWi's Godot palette swap shader.
Try it in the editor
Everything in this guide runs in the browser. No install, no account, and your images never leave your device.