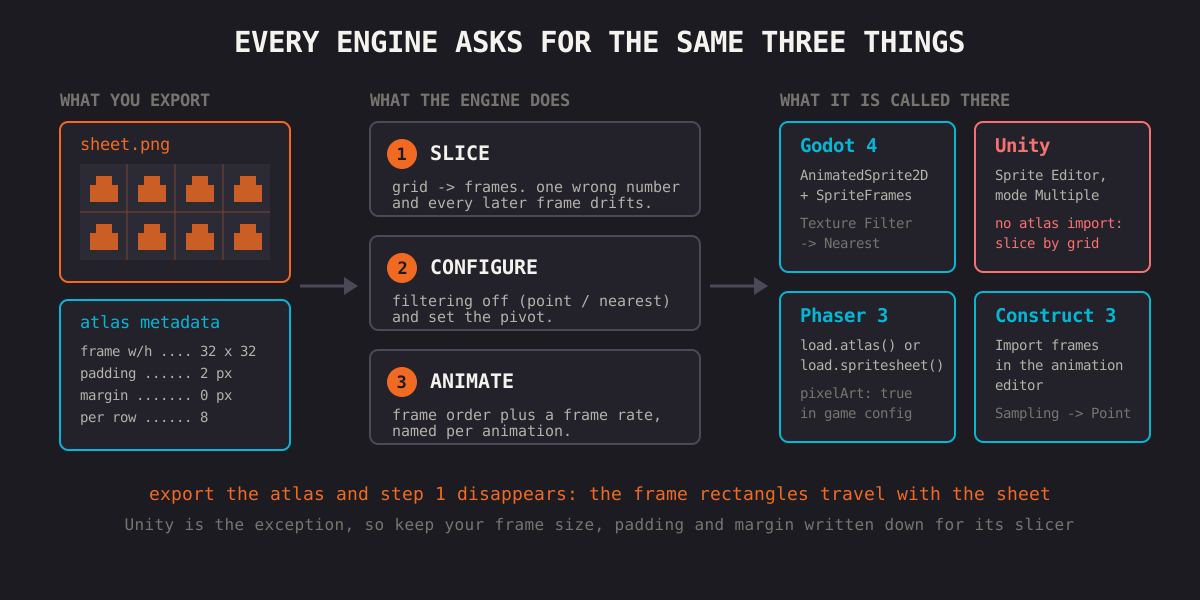
Every engine needs the same three things: where each frame is, how to filter the texture, and what order and speed to play the frames in. Godot 4 uses AnimatedSprite2D with a SpriteFrames resource, Unity the Sprite Editor in Multiple mode, Phaser a frameWidth/frameHeight loader config, and Construct 3 an import from a sprite strip. In all four, use nearest filtering for pixel art and enter the frame size exactly. If your engine reads an atlas file, export one and skip the manual slicing.
Exported Is Not the Same as Working
Exporting the sheet takes a click. Getting the engine to treat that image as separate frames, play them in order, and keep the pixels sharp is where the time goes.
The engines use different names for the same three jobs: slice the sheet into frames, configure filtering and pivot, and animate the frames. This guide walks through all three in Godot 4, Unity, Phaser and Construct 3.
Two Settings That Apply Everywhere
Filtering: nearest (also called point). Pixel art needs nearest-neighbor sampling, or it blurs as soon as it is drawn at any size other than 1:1. Linear filtering is a common engine default because it suits photos and high-resolution art. It is the usual answer to "why is my pixel art blurry".
Frame size: exact. If the slicer is one pixel off, the first frame looks right and every following frame drifts a little further sideways.
Get your numbers from the sheet you exported. In this editor, padding is added inside each cell, on every side of the frame. So the exported sheet is a plain grid with no gaps between cells and no outer margin. The values to type into a slicer are: frame size = the cell size shown in the top bar (art size plus padding on both sides), spacing or separation = 0, margin or offset = 0, and the number of columns and rows. For 32x32 art with 2 px padding, that is a 36x36 frame with 0 spacing.
Skip the Slicer: Export an Atlas File
Slicing by hand is the fallback. If your engine reads an atlas file, export one instead and the frame rectangles come from the file. The Format button in the editor's Export panel writes these:
| Export | Use it with | What you get |
|---|---|---|
| Phaser / PixiJS | Phaser 3, PixiJS | TexturePacker-compatible JSON atlas |
| Godot | Godot 4 | SpriteFrames resource (.tres) |
| Aseprite | Tools that read Aseprite JSON | Aseprite-compatible JSON atlas with one frame tag |
| Tiled | Tiled | JSON tileset (.tsj) |
| CSS Sprites | Web pages | One CSS class per frame |
| Sparrow / Starling XML | Sparrow, Starling, HaxeFlixel/FNF | TextureAtlas XML, frames named from a prefix you choose |
Unity does not read any of these out of the box, so for Unity you export the PNG and slice it in the Sprite Editor, as described below.
Godot 4
Godot has two routes, depending on whether you need animation or a single region.
Animation with AnimatedSprite2D:
- Add an
AnimatedSprite2Dnode. - In the Inspector, create a new
SpriteFramesresource in the Sprite Frames property and click it to open the SpriteFrames panel at the bottom of the editor. - Click the Add frames from sprite sheet button and choose your PNG.
- Set Horizontal and Vertical to the number of columns and rows. Leave Separation and Offset at 0 for sheets from this editor. Check that the grid overlay lines up with each frame.
- Select the frames, click Add, name the animation, set its FPS, and turn on looping if it should repeat.
- Play it from a script with
$AnimatedSprite2D.play("walk").
A single region with AtlasTexture: create an AtlasTexture, set the sheet as its Atlas, and set Region to the frame's rectangle. This suits static tiles and UI pieces.
The Godot export from the Format dialog replaces steps 2 to 5. It writes a SpriteFrames resource with one looping animation called default at 12 FPS, with every frame in order. It points at the image as res:// plus the PNG's file name, so put the PNG in the project root or change that path in the .tres. Then rename the animation and adjust its speed in the SpriteFrames panel.
Turn off filtering: Project Settings -> Rendering -> Textures -> Canvas Textures -> Default Texture Filter -> Nearest. This applies to the whole project; individual nodes can still override it with their own Texture Filter property.
Unity
In Unity everything goes through the Sprite Editor.
- Drag the PNG into the Project window and select it.
- In the Inspector, set Sprite Mode to Multiple. That tells Unity the file holds more than one sprite.
- Set Filter Mode to Point (no filter) and Compression to None, then click Apply.
- Set Pixels Per Unit to the number of pixels that should equal one world unit in your game, often your tile or frame size.
- Open the Sprite Editor. In the Slice menu set Type to Grid By Cell Size, enter the frame size, leave Offset and Padding at 0 for sheets from this editor, then click Slice and Apply.
The sheet now expands into numbered sprites in the Project window.
To animate: select the sliced sprites and drag them into the Scene view together. Unity asks where to save a new Animation Clip and creates an Animator Controller for it. To change the frame rate, open the clip in the Animation window and set its sample rate; if the Samples field is hidden, enable Show Sample Rate from the window's options menu.
For pixel art cameras: Unity's Pixel Perfect Camera component (in the 2D Pixel Perfect package, or built into URP's 2D renderer) snaps rendering to whole pixels based on your Pixels Per Unit, which stops the shimmer you get when the camera moves by fractions of a pixel. The pixel-perfect scaling guide explains the cause.
Phaser 3 / 4
Phaser has no visual slicer. You describe the grid in the loader:
// In preload()
this.load.spritesheet('hero', 'assets/hero.png', {
  frameWidth: 36,
  frameHeight: 36,
  margin: 0,
  spacing: 0,
});

// In create()
this.anims.create({
  key: 'walk',
  frames: this.anims.generateFrameNumbers('hero', { start: 0, end: 7 }),
  frameRate: 12,
  repeat: -1, // loop forever
});

const hero = this.add.sprite(100, 100, 'hero');
hero.play('walk');
frameWidth and frameHeight are the cell size from the editor (36 here, for 32x32 art with 2 px padding). spacing is the gap between cells and margin the border around the whole image; both are 0 for this editor's sheets, but a sheet from another tool may need them.
If you exported the Phaser / PixiJS JSON, load it as an atlas instead and refer to frames by name:
this.load.atlas('hero', 'assets/hero.png', 'assets/hero.json');
For pixel art, set pixelArt: true in the game config. It switches texture filtering to nearest for the whole game.
Construct 3
Construct does this through its animation editor.
- Add a Sprite object to the layout. The Animations editor opens.
- Right-click in the animation frames bar and choose Import frames -> From sprite strip.
- Pick the PNG and enter the number of horizontal and vertical cells. Construct cuts the image into equal frames.
- In the animation's properties, set Speed (frames per second) and Loop.
- For pixel art, set Sampling in the Project Properties to nearest (point) sampling.
The strip import only asks for cell counts, so it assumes the image is an even grid with no gaps. Sheets from this editor meet that, padding included, because the padding sits inside each cell. A sheet from another tool with gaps between frames needs re-exporting without them, or importing as separate frames.
Side by Side
| Job | Godot 4 | Unity | Phaser | Construct 3 |
|---|---|---|---|---|
| Slice | Add frames from sprite sheet | Sprite Editor, Multiple | load.spritesheet |
Import frames from strip |
| Frame size | Horizontal / Vertical counts | Grid By Cell Size | frameWidth/frameHeight |
Horizontal / vertical cells |
| Gaps | Separation, Offset | Padding, Offset | spacing, margin |
Not supported (even grid) |
| Filtering | Default Texture Filter -> Nearest | Filter Mode -> Point | pixelArt: true |
Sampling (project setting) |
| Animate | SpriteFrames panel + play("name") |
Animation Clip + Animator | anims.create + play |
Speed + Loop |
| Atlas file | .tres from the Godot export |
None built in | JSON via load.atlas |
None built in |
Export the PNG and the atlas file your engine reads.
When the Import Looks Wrong
- Frames drift further sideways the later they are. The frame size or spacing is off. Check the cell size in the editor's top bar, not the size of the original art.
- Everything is blurry. Filtering is still linear. Switch it to nearest or point as described for your engine.
- Thin lines flicker at frame edges. That is texture bleeding, which comes from how the sheet is packed and filtered. The padding guide covers the fix.
- The animation plays at the wrong speed. The atlas files carry frame rectangles, not your intended timing (the Godot export uses 12 FPS). Set the frame rate in the engine.
Try it in the editor
The editor is free and needs no account. Open it in another tab and work through the steps above with your own frames.