tModLoader is a free, separate Steam app that runs Terraria with mods. Installing mods is a few clicks in its Workshop menu. Making one takes C#, but less than you would think: tModLoader generates a working template, and a new item is one class plus one PNG with the same name. Terraria art is drawn at 2x, so every pixel of your sprite is a 2x2 block in the file. Animated enemies use one column of frames, stacked top to bottom.
Install tModLoader
If you own Terraria on Steam, search the store for tModLoader and install it. It is free and shows up as its own game in your library, so your vanilla Terraria stays untouched. Modded characters and worlds are saved in their own folder, so a mod that misbehaves cannot damage your vanilla saves.
Install Mods
Launch tModLoader and open Workshop, then Download Mods. Browse or search, subscribe to what you like, and go back to Manage Mods to switch each one on. Click Reload Mods and they load.
Big content mods like Calamity or Thorium change progression a lot. A few things help:
- Make a new character and world for a heavily modded playthrough. Removing a content mod later can leave holes in a world that used its blocks.
- Watch the loading screen. When a mod fails, tModLoader names it and shows the error. Disable that one and the rest still work.
- Save mod packs. The Mod Packs screen in the Workshop menu stores a set of enabled mods, so you can flip between a light setup and a full overhaul.
Set Up for Making Mods
Open Workshop, then Develop Mods. The first time, tModLoader checks for the .NET SDK it needs and tells you which version to install if it is missing. Do what it says; that screen knows its own requirements better than any guide.
You also want a code editor. Visual Studio Community or JetBrains Rider give you autocomplete for the whole Terraria API, which matters, because a lot of modding is finding out what a field is called.
Click Create Mod, fill in a name without spaces (say MyFirstMod), a display name and your name. tModLoader writes a project into:
Documents/My Games/Terraria/tModLoader/ModSources/MyFirstMod/
The template already contains one working sword. Back in Develop Mods, click Build + Reload next to your mod. When the game comes back, the sword is in the game. That loop, edit then Build + Reload, is how you will work from now on.
How Textures Find Their Code
tModLoader matches textures to classes by path. A class MyFirstMod.Content.Items.EmberBlade in Content/Items/EmberBlade.cs uses the image at Content/Items/EmberBlade.png. There is no texture registration step. Name the file right and it loads.
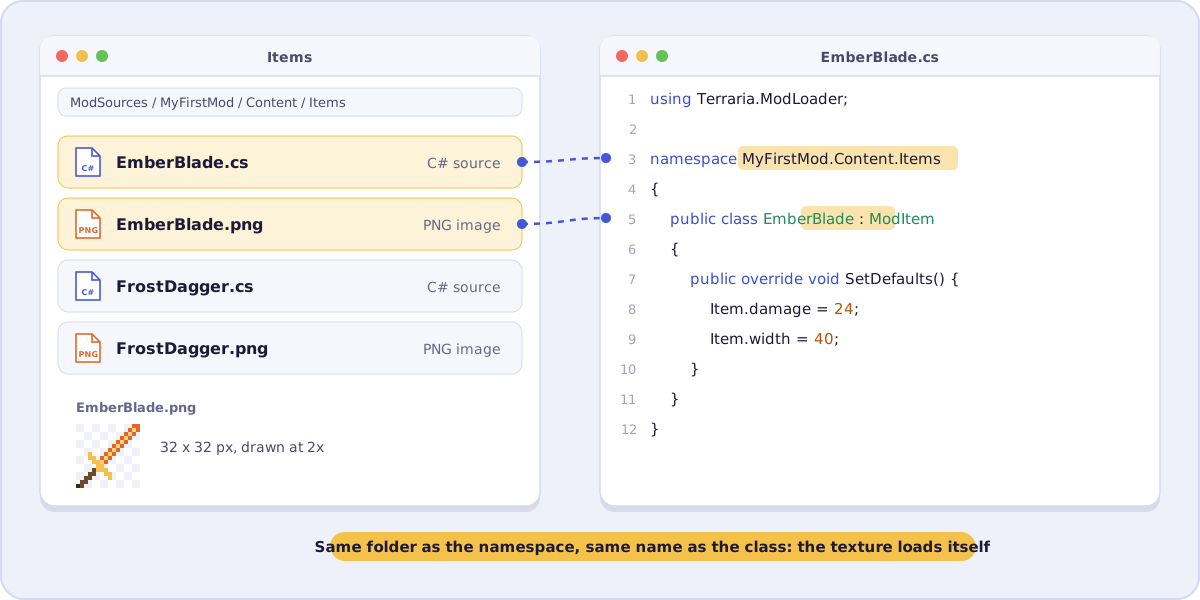
When the PNG is missing or misnamed, the build still succeeds but loading fails with an error that names the path it looked for. Compare that path with your file and you have your answer.
Draw at 2x
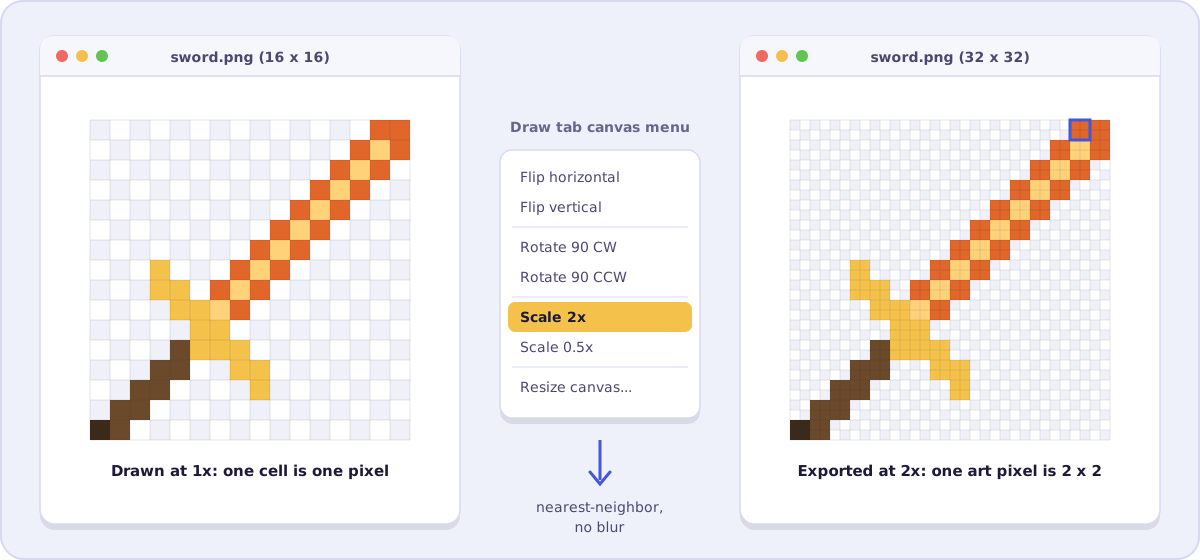
Terraria's pixel art uses 2x2 blocks: what looks like one pixel in the game is four pixels in the file. Vanilla sprites are all made this way, so a sprite drawn at 1x looks half the size of everything around it, with suspiciously fine detail.
Draw at 1x, because it is easier, then scale by exactly 2 with nearest-neighbor before you export. Never 1.5x or anything else that is not a whole number; the pixel-perfect scaling guide explains what that does to the pixels. In this editor, Scale 2x in the Draw tab does it per frame without blurring, and 2x in the sidebar's Pixel Cleanup panel doubles every frame in the layer at once.
Make an Item
Here is a complete melee weapon with a recipe. Put it in Content/Items/EmberBlade.cs and the sprite next to it as EmberBlade.png:
using Terraria;
using Terraria.ID;
using Terraria.ModLoader;

namespace MyFirstMod.Content.Items
{
    public class EmberBlade : ModItem
    {
        public override void SetDefaults() {
            Item.width = 40;
            Item.height = 40;
            Item.damage = 24;
            Item.DamageType = DamageClass.Melee;
            Item.useTime = 20;
            Item.useAnimation = 20;
            Item.useStyle = ItemUseStyleID.Swing;
            Item.knockBack = 5;
            Item.value = Item.buyPrice(silver: 50);
            Item.rare = ItemRarityID.Orange;
            Item.UseSound = SoundID.Item1;
            Item.autoReuse = true;
        }

        public override void AddRecipes() {
            CreateRecipe()
                .AddIngredient(ItemID.HellstoneBar, 12)
                .AddTile(TileID.Anvils)
                .Register();
        }
    }
}
useTime and useAnimation are in ticks, and Terraria runs at 60 ticks per second, so 20 means three swings a second. width and height set the hitbox; match them roughly to the sprite.
The item's display name and tooltip do not go in the code. After a Build + Reload, tModLoader adds entries for the new item to the .hjson file in your mod's Localization folder. Fill them in there, and translators can later add other languages next to it.
Make an Animated Enemy
Enemies are where sprite sheets come in. Terraria wants the frames of an NPC in one column, every frame the same height, first frame at the top. The game divides the image height by the frame count you set to find each frame.
This slime-like enemy borrows vanilla slime behavior and runs its own four-frame animation:
using Terraria;
using Terraria.ID;
using Terraria.ModLoader;

namespace MyFirstMod.Content.NPCs
{
    public class EmberSlime : ModNPC
    {
        public override void SetStaticDefaults() {
            Main.npcFrameCount[Type] = 4;
        }

        public override void SetDefaults() {
            NPC.width = 32;
            NPC.height = 24;
            NPC.damage = 14;
            NPC.defense = 4;
            NPC.lifeMax = 60;
            NPC.HitSound = SoundID.NPCHit1;
            NPC.DeathSound = SoundID.NPCDeath1;
            NPC.aiStyle = NPCAIStyleID.Slime;
            AIType = NPCID.BlueSlime;
        }

        public override void FindFrame(int frameHeight) {
            NPC.frameCounter++;
            if (NPC.frameCounter >= 10) {
                NPC.frameCounter = 0;
                NPC.frame.Y = (NPC.frame.Y + frameHeight) % (Main.npcFrameCount[Type] * frameHeight);
            }
        }

        public override float SpawnChance(NPCSpawnInfo spawnInfo) {
            return SpawnCondition.OverworldDaySlime.Chance * 0.3f;
        }
    }
}
FindFrame moves down one frame every 10 ticks, so six frames per second, and wraps back to the top. If you would rather copy a vanilla enemy's animation exactly, delete FindFrame and set AnimationType = NPCID.BlueSlime;, but then your sheet needs the same frame count and order as the vanilla one.
To build the sheet, put the frames in the sprite sheet editor, set Columns to 1, and export a PNG named EmberSlime.png. Check the result: if the image is 32 pixels wide and 4 frames of 24 pixels, it should be exactly 32x96.
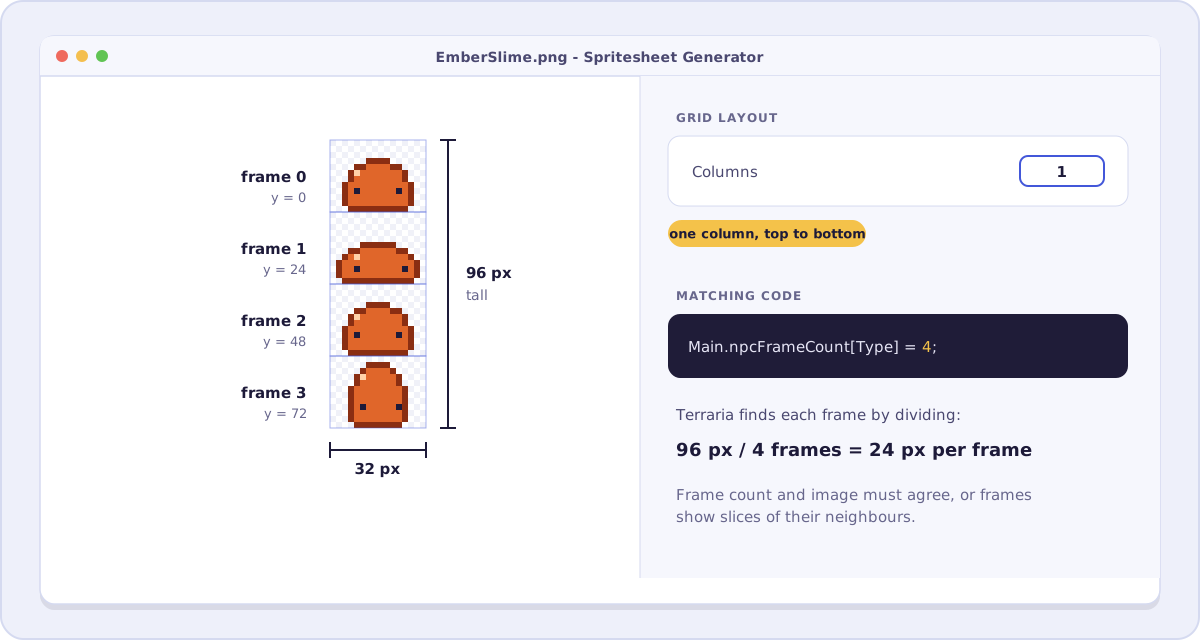
If the frame count in code and the frames in the image disagree, you get a sprite that slides upward through its frames and shows slices of two at once. Count the frames in the PNG, then check Main.npcFrameCount.
Retexture Without Code
You do not need tModLoader to change how vanilla Terraria looks. Terraria has built-in resource packs: a folder with a pack.json and replacement images in Content/Images, named exactly like the vanilla textures (Item_1.png, NPC_1.png and so on). Enable it in the game's Resource Packs menu. It is the simplest route if all you want is new art for existing things.
Finding Art
Drawing everything yourself is the slow part of any content mod. The gallery has sheets other people published for anyone to reuse, including in mods, and the Terraria mod sprites page shows the sizes that fit. Stick to original art: vanilla sprites belong to Re-Logic, and sprites ripped from other games are worse.
Publish
Back in Develop Mods, click Publish next to your mod. tModLoader builds it, asks for a description and tags, and uploads it to the Steam Workshop. Bump the version in build.txt before each update so players know they have the new one.
Stack your frames into one column and export the PNG. Open the editor
Try it in the editor
The editor is free and needs no account. Open it in another tab and work through the steps above with your own frames.